
Saturday, December 21, 2013
Quickie- Killer is Dead title card
To break in the new Cintiq, I made a title card for Lotus Prince's series of Let's Plays on the Killer is Dead game. Considering I was working without lineart for the first time and trying to emulate the cel shading of the game, I think it came out pretty well. Still, my lack of practice for a month shows, and I'll hopefully be practicing a lot more in the coming break.

Thursday, December 19, 2013
Update 12/19/13
I received my new Cintiq, so I hope to get back into illustrating within the next few days. Hopefully I didn't fall too out of practice in the interim.
Wednesday, November 6, 2013
Hiatus with a side of rant
So while I was planning on not doing any paintings this month while I work on the NaNoWriMo, it turns out that I don't have the option to at the moment if I wanted to.
As it turns out, the auto-update to Maverick screwed my system up. Shocker. I came out of the update with a knowledge of how to turn off auto-updates, that recently cleaning my backup drive to give it room for new backups was a really poorly timed decision, and that the Cintiq 15x I use will likely not work with Maverick. Since its last Mac driver update was in 2012, I don't foresee the problem being fixed. I now find myself pondering the joys of either needing to shell out for a newer Cintiq or trying to find a way to downgrade that doesn't immediately void my Mac's warranty, neither of which is a very pleasant option.
As it turns out, the auto-update to Maverick screwed my system up. Shocker. I came out of the update with a knowledge of how to turn off auto-updates, that recently cleaning my backup drive to give it room for new backups was a really poorly timed decision, and that the Cintiq 15x I use will likely not work with Maverick. Since its last Mac driver update was in 2012, I don't foresee the problem being fixed. I now find myself pondering the joys of either needing to shell out for a newer Cintiq or trying to find a way to downgrade that doesn't immediately void my Mac's warranty, neither of which is a very pleasant option.
Tuesday, October 29, 2013
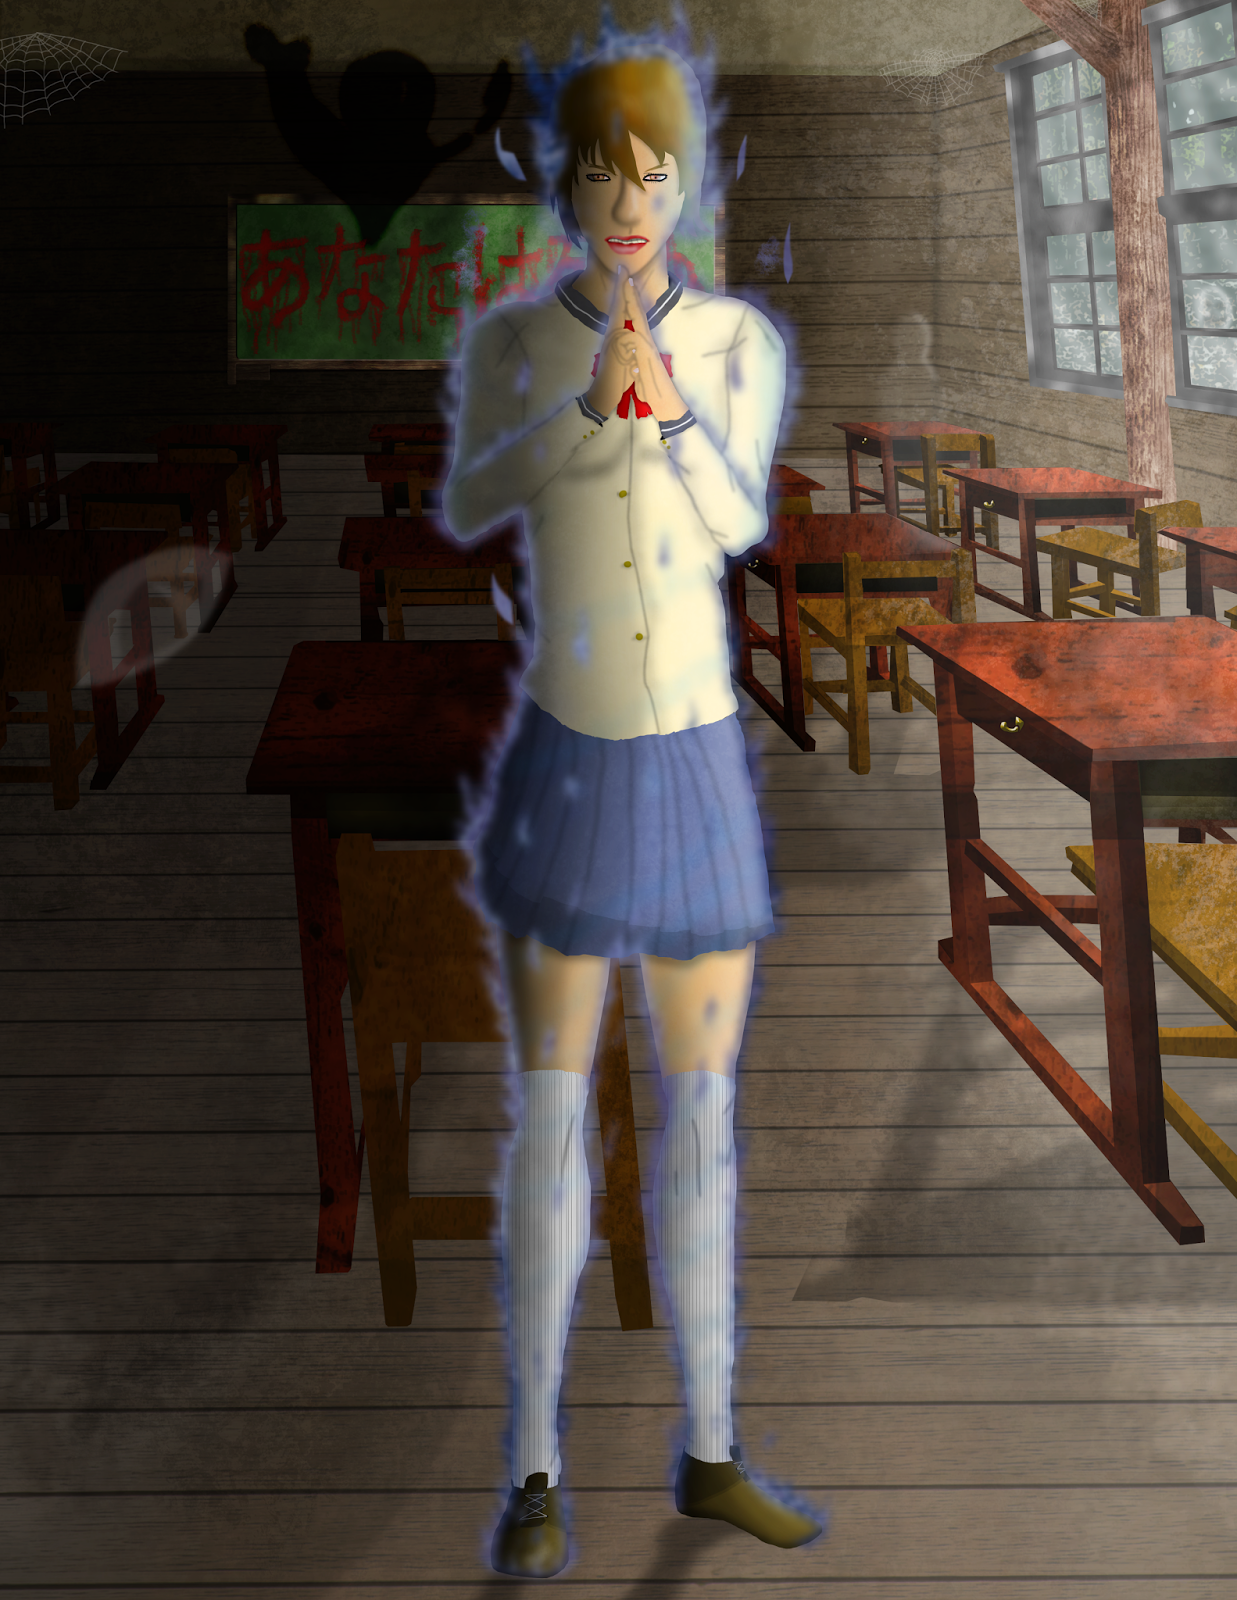
Spiritus
The finished painting of the Ghost Hunt anime.

Made between October 3-October 29 (with lots of distractions between)
Materials: Poser 9 (Alyson model), Photoshop CS6
Total Time: 12 hours

Made between October 3-October 29 (with lots of distractions between)
Materials: Poser 9 (Alyson model), Photoshop CS6
Total Time: 12 hours
Sunday, October 20, 2013
Tattoo Illustration
Someone on an Aspergers Facebook page I follow was looking for a tattoo design, and what she was asking for gave me an idea. It's simple, but I think it would work as a tattoo.


Saturday, October 19, 2013
The Making of "Spiritus"
Because I was feeling a bit nostalgic, I decided to re-watch a fantastically creepy anime called Ghost Hunt, which inspired this painting.

Step 1: Lineart (2 hours, 10 minutes)
I first made a pose reference in Poser 9, which I used to set up the character of the piece, Mai Taniyama. I used some references for older Japanese schoolrooms for the background, as well. I then illustrated the digital rough with Photoshop CS6's round brush, with flow set to pen pressure control.

 Step 2: Color, Texturing, and Shading (6 hours, 20 minutes)
Because of how I was doing this painting, everything basically became one step, starting from the texturing in the background up. I used several photos I've taken over time of woods, as well as a filter gallery effect, to create the classroom, desks, and board. I also used an explosion brush at various opacities to layer various effects into the wood. I also made a photo of the woods into a painting effect, and put it beneath the window and its metal textures.
When that was done, I again used the explosive brush to texture the chalk portion of the chalkboard, and created some bloody Asian text for the board. I created the flames around Mai's body in much the same way, using a mask.
Finally, I created various apparitions using the round brush and various opacities, along with the gaussian blur filter.
 Step 3: Contrast and more detail work (2 hours)
I went in and, using the lineart as a guide, masked in shadows and highlights to the desks and Mai, as well as working a bit more on the spirits around her.

Step 4: More detail work (30 minutes)
I added more details to the floor, support beam, and Mai's hair. I also put a creature in the back corner to try to make it seem like the unnatural dark had a source other than the spirits in general.
 Step 5- More Touch-ups (1 hour)
To finish things off, I added adjustment layers for the contrast and saturation. I added more detail for the desks, as well as Mai's eyes and hair. Most importantly, I worked on the lighting so there wasn't half of the image seeming burned off.
Made between October 3-October 29 (with lots of distractions between)
Materials: Poser 9 (Alyson model), Photoshop CS6
Total Time: 12 hours

Step 1: Lineart (2 hours, 10 minutes)
I first made a pose reference in Poser 9, which I used to set up the character of the piece, Mai Taniyama. I used some references for older Japanese schoolrooms for the background, as well. I then illustrated the digital rough with Photoshop CS6's round brush, with flow set to pen pressure control.

 Step 2: Color, Texturing, and Shading (6 hours, 20 minutes)
Because of how I was doing this painting, everything basically became one step, starting from the texturing in the background up. I used several photos I've taken over time of woods, as well as a filter gallery effect, to create the classroom, desks, and board. I also used an explosion brush at various opacities to layer various effects into the wood. I also made a photo of the woods into a painting effect, and put it beneath the window and its metal textures.
When that was done, I again used the explosive brush to texture the chalk portion of the chalkboard, and created some bloody Asian text for the board. I created the flames around Mai's body in much the same way, using a mask.
Finally, I created various apparitions using the round brush and various opacities, along with the gaussian blur filter.
 Step 3: Contrast and more detail work (2 hours)
I went in and, using the lineart as a guide, masked in shadows and highlights to the desks and Mai, as well as working a bit more on the spirits around her.

Step 4: More detail work (30 minutes)
I added more details to the floor, support beam, and Mai's hair. I also put a creature in the back corner to try to make it seem like the unnatural dark had a source other than the spirits in general.

To finish things off, I added adjustment layers for the contrast and saturation. I added more detail for the desks, as well as Mai's eyes and hair. Most importantly, I worked on the lighting so there wasn't half of the image seeming burned off.
Made between October 3-October 29 (with lots of distractions between)
Materials: Poser 9 (Alyson model), Photoshop CS6
Total Time: 12 hours
Sunday, October 13, 2013
Quickie- "Feast"
I decided to try my hand at a vampire piece. That it happened to coincide with my 7 Deadly Sins project in my advertising class certainly gave me some motivation.


Sunday, October 6, 2013
Quickie- "Have a Very Lovecraftian October"
I decided to kick off Frightober, my favorite month of the year, by doing an illustration of H.P. Lovecraft, one of my all-time favorite writers.

Made from October 4-October 6
Materials: Photoshop CS6
Total Time: 3 hours

Made from October 4-October 6
Materials: Photoshop CS6
Total Time: 3 hours
Friday, October 4, 2013
October Preview
I've had a busy two days in Poser setting up a few of this month's illustrations. Here are some things to look forward to:
Tuesday, October 1, 2013
Week of September 31- Results of Boredom
While not doing a planned illustration this week, I am still doing some design work. Here are the results:

A self portrait made in MangaStudio EX4 and Photoshop CS6.

A self portrait made in MangaStudio EX4 and Photoshop CS6.
Sunday, September 29, 2013
Update- The Weeks of September 23 and September 30
So, I got a bit distracted with some recent fantastic reads, as well as doing some copywriting work and a general lack of energy. So, while I rather like the Joker/Harley/Batgirl painting I started this previous week, I'm shelving it where it currently is done to, until some time later in October, after my planned break next week. On the plus side, one of the weeks in October should have more than one illustration out, and I might get some work done on a comic idea I have when I'm not relaxing. Though I just got a deal that got me Poser 9 and MangaStudio, so I might just be doing that all next week instead.
Cheers,
ET
Saturday, September 21, 2013
Quickie- "King's Domain"
For a deviantART contest I'm entering, I decided to first take a try at creating the original character Hyde that they have.
Contest is here.
 Total Time: Roughly 9.5 hours
Materials: Poser 8, Photoshop CS6
Contest is here.

Materials: Poser 8, Photoshop CS6
Saturday, September 14, 2013
Lycoming County Fair- Airshow Photo Shoot
I got out to the airshow in Lycoming County, PA yesterday. Here are the best shots to come from it:
Friday, September 13, 2013
Super Soldier
This week's painting was focused on the Marvel comics character X-23, a woman cloned from Wolverine who started out in the cartoons and proved popular enough to be put into the comics.

Made from September 9-September 14
Total Time: 7.5 hours
Materials/Programs: Poser 8, Photoshop CS6

Made from September 9-September 14
Total Time: 7.5 hours
Materials/Programs: Poser 8, Photoshop CS6
Wednesday, September 11, 2013
The Making of "Super Soldier"
For this week's painting, I'm painting the Marvel comics character X-23.
Step 1: Lineart (1 hour, 40 minutes)

To start off the piece, I worked with the Maria character model in Poser 8 to set up the base pose and anatomy:

From there, I used some references for the X-23 character to design her clothes and hair, all with the round brush and pen tool, with flow and opacity on Pen Pressure control, in Photoshop CS6. The belt is made with the circular marquee, a stroke, and some layer effects, including beveling and inner shadows.
Thursday, September 5, 2013
Summer Wrap-Up
Since I start the Fall semester next week, I've decided to make a post cataloguing what I've done over the summer, and how my skill level has improved:
Tuesday, September 3, 2013
Photo Contest
I've decided to take up actively looking for art contests to enter. For this post, I'm talking about the ArtSchool photography contest. I need 30 votes to get into the finals, and I'm in no way above shameless self-promoting to get them!
To vote, click on the link, which will take you to my page on their site: link
To vote, click on the link, which will take you to my page on their site: link
The photos I'm entering are:
Sunday, September 1, 2013
Valkyrur
This week's painting, focused on the valkyrur, warrior side to the Alicia Melchiott character from the Valkyria Chronicles video game and anime series.

Made between August 26 to September 2
Total Time: 7.5 hours
Materials/Programs: Wacom Cintiq 15x, Photoshop CS6, Poser 8

Made between August 26 to September 2
Total Time: 7.5 hours
Materials/Programs: Wacom Cintiq 15x, Photoshop CS6, Poser 8
Lake Tobias Zoo photography
For the first time in a long time, I had a very fortuitous photo shoot, which gave me plenty of quality photos. Below is thumbnails for all photos I consider contest-quality; click on any to enlarge them.
Tuesday, August 27, 2013
The Making of "Valkyrur"
For this week's painting, I decided to do a painting on an awesome tactical strategy video game turned into an equally awesome anime, Valkyria Chronicles. I have ideas for more complicated pieces based on the series, but for this one, I'm just focusing on my character skills.

Step 1: Rough (1 hour)
This week, I'm trying out a new process. For the first step, I set up the digital rough for where my colors will go in the next step. I used Poser 8 as the anatomy reference, and watched some pieces of the anime again to get references for her costume and gear.

Step 1: Rough (1 hour)
This week, I'm trying out a new process. For the first step, I set up the digital rough for where my colors will go in the next step. I used Poser 8 as the anatomy reference, and watched some pieces of the anime again to get references for her costume and gear.
Sunday, August 25, 2013
Council Cup

I managed to get a panorama on a trip to Council Cup in Pennsylvania, before my camera's battery died on the unexpected outing.
Friday, August 23, 2013

Friday, August 16, 2013
Bloodline

Designed from August 12 to August 16
Total Time: 10 hours
Materials/Programs: Poser 8, Photoshop CS6, Wacom Cintiq 15x
Wednesday, August 14, 2013
Mid-"Bloodline" distractions

So, when I finished the color flats, I took a break from my current painting of the DC comics character Raven, and decided to see if I've improved at all. So I decided to draw a different perspective without any references. I'd say I have, and now I have a reference for how I'm likely going to shade Raven's face in the painting. As opposed to the 6 hours so far in that painting, this took me a total of 15 minutes. As it turns out, doing these paintings weekly is definitely helping me improve.
Sunday, August 11, 2013
Making of "Bloodline"
For this week's painting, I decided to paint Raven, one of my favorite characters in any medium, as well as her father Trigon. This is the first piece I'm planning to have as little line in as possible, by the end. Once I get to the color flats stage, I'll be using the lineart as a guideline and will be making it more painterly than the rest of the pieces thus far have been.

Step 1: Digital Rough (1.5 hours)
I created a quick guideline render in Poser 8 and proceeded to rough out the musculature of Raven and Trigon, using the round brush with flow set to pen pressure control. While I grew up on the 2000 cartoon rather than the comics, I'm going with the less waifish comic character design, using elements both from the older comics as well as the New 52. At this stage, the bird behind Raven and Trigon's musculature seem to be in most need of improvement, though everything is rather rough at the moment. Far less so than my previous digital roughs, though, so I count it as an accomplishment.
Saturday, August 10, 2013
Week of August 5
I decided that, at present, my level is not where it needs to be at to complete the Yuki-Onna painting I worked on this week. Instead, I will be shelving it for a time later in the year, most likely some time during the Winter season.
Saturday, August 3, 2013
Blog Update (8/3/13)
I've added several ways for people to subscribe to the blog, should they so choose, though I'm not entirely sure that you will get email updates from following me, as you will by signing up with your email. Feel free to correct me if I'm wrong on that.
After several hours working on coding forms for the blog, organizing things better, and looking into the scripts and coding I need to make contact forms that will email me without forcing open peoples' email client, I've rediscovered why I switched from the web design program to computer graphics.
I've updated my schedule page so that it's better organized, and not so much of a scroll. I decided
Friday, August 2, 2013
Wiñay Marka

For this week's painting, I decided to make another ensemble painting similar to Alice, focusing on the landscape and anatomy skills. Also, I figured out how to make design at least semi-believable fire, which is definitely an accomplishment for me.
Made between July 29 and August 2
Completion time: 20 hours
Materials: Poser 8, Photoshop CS6
Tuesday, July 30, 2013
The Making of Wiñay Marka
For this week's painting, I decided to make a tribute to one of the best anime I've watched, El Cazador de la Bruja (Hunter of the Witch). The manga is terrible, but the anime is one of the few on the long list of anime that've kept me entertained since childhood that I've watched multiple times without losing any enjoyment for it.

Step 1: Roughs (5 hours, 40 minutes)
I started out the painting by using Alyson and Ryan figures in Poser 8 to set up the basic poses for the piece. I then proceeded to draw a detailed rough, using both the Poser render and several reference photos of the anime. At this point, for whatever reason, I have had a lot easier time so far drawing out the Jody Hayward, Ricardo, and Lirio characters than the main characters Nadie and Ellis. I'm really hoping that I can change that in the next stage.
Tuesday, July 23, 2013
Doctor Fate

A painting I decided to do on Doctor Fate, partly because he was one of the first characters I was ever introduced to in the DC Universe, and partly because I wanted to paint a few more atmospheric, magical characters before I start on my eventual painting of Raven, which will involve a lot of effects and landscape, as of the current idea I have for her.
Made between July 22nd and July 23rd, in 6.5 hours, using Poser 8 and Photoshop CS6, along with a Wacom Cintiq 15x.
Monday, July 22, 2013
The Making of Doctor Fate
For this week's painting, I decided to do a more atmospheric piece, and so I decided to try to make a piece focusing on the more tragic side of Doctor Fate's story.

Saturday, July 20, 2013
Woodward Caves Take 2
After a poor attempt at photographing them mid-tour, I went back to Woodward Caves in Pennsylvania today, after arranging for a photo tour of the place. Have to say, without worrying about interrupting a tour and being able to take time to set shots up, the place is phenomenal for a photo shoot. I managed to get quite a few photos, mostly for my texture library, but I came out of it with some panoramas that, I think at any rate, came out looking awesome:


Monday, July 15, 2013
Reminiscing On My Previous Semester
I was going over some of my older works, and thought I should put what was hands-down the best things I did in the entirety of my previous semester here.
Animation:
If I can pick a definitive point where my art skills started what is, admittedly a tad egotistically, a very rapid increase, it was with this animation, where for the most part, I designed the characters, set the animation up, did the soundtrack, and managed to hook a va, all in the span of the seven days before the project was due in my animation course.
Sunday, July 14, 2013
Week of July 15
Like I said in my schedule page, the week of the 15th will be a week off from digital painting, but I somehow doubt I'll be getting overmuch rest. Between working more on this blog, doing some copyediting, and doing a job over the next week that includes both doing some designs, mostly simple illustrations, and working on a website, it's probably a good thing I decided to break from the painting.
So far, I've decided that I'll be putting some of my photography up here as well, starting with my next photo op, which will hopefully be a re-shoot of a botched trip to Woodward Caves in Pennsylvania a few weeks ago. I'll also probably be making a page dedicated to contests I enter, what awards, if any, I get from them, and any certifications I get, which will save me time when I eventually build my website.
That all said, I won't be totally relaxing from painting work, since I'll at least be getting some sketching and setting up the Poser bases done for my Doctor Fate painting next week.
Friday, July 12, 2013
The Making of Alice: Madness Returns

Alice: Madness Returns

I was recently hearing news of American McGee's Kickstarter for the new game he and Spicy Horse are making, OZombie, and got hit with a huge bout of nostalgia, Alice and, particularly, Alice: Madness Returns being two games I greatly enjoyed when I discovered them. So, naturally, I decided on this as the source for my next painting, and possibly more in the future.
Made in roughly 26 hours, between July 9 and July 12.
The Making of Catwoman

Catwoman

For my next digital painting, I decided to focus more on small details and light sources, and after reading the recent New 52 Catwoman comic volumes, I decided to make her my next subject.
Made in about 14 hours total, between June 29 and July 5, 2013.
The Making of Huntress & Question

Huntress & Question

After re-watching the Justice League Unlimited cartoon, I decided to make my second digital painting of the pair of characters Huntress and The Question, both of whom I found very interesting.
Created between June 22 and June 24, 2013, in about 14 hours total.
The Making of Zatanna

Zatanna (My First Digital Painting)

After recently watching the show Young Justice, and re-watching many of the DC cartoons I grew up on, I decided to make one of my favorite characters in the DC universe, and one of the first comic series I ever actually read, a try as the first full digital painting I've ever done.
It took me roughly 12 hours from getting the design's idea to completion. I'll be uploading another post discussing in detail everything that was involved in its creation.
Created between June 15 and June 17, 2013.
Subscribe to:
Comments (Atom)